A couple of days ago, I started implementing a rather interesting piece of code. It was late into the night, and I was not feeling like doing my regular work and neither was I sleepy. At that time, I was reminded of another project where we needed to provide users the ability to browse and upload files while entering content through the WYSIWYG editor we would provide them.
Basically the project was an eLearning web portal and users needed the ability to enter content through a WYSIWYG editor, upload files through the editor itself, browse the files on the server and further select image/media files on the server to insert them inline into the Html content in the editor. In short, they needed a kind of Image, Media and File Manager to integrate and operate seamlessly from the WYSIWYG editor.
Although I have used many of them earlier, TinyMCE has been my WYSIWYG editor of choice lately. I quickly checked the plugins for the latest version of TinyMCE and it does not ship with such a File Manager natively. However I noticed 2 related commercial plugins from the TinyMCE creators themselves. After some thought, I decided to implement the plugin myself as I was not sure that the functionality I needed would be available exactly from the commercial plugins. I needed the plugin to work exactly like my specifications. So, I spent late Thursday night and bulk of today (Sunday) coding the plugin and I have been really pleased on how it has shaped up. So much so, that I decided to share the plugin with the community  …
…
So, let’s now discuss somethings about the plugin itself. This plugin is based on ExtJs 4.x for TinyMCE 3.x.
We were using ExtJs 4 in UI for this eLearn Portal already. So, ExtJs was the natural choice when it came to using the Tree, Grid and other components that would be required for a FileManager/FileBrowser kind of a plugin. The major challenge was not so in coding the FileManager/Browser functionality with ExtJs but more with understanding how plugins work in TinyMCE (mind you, this was my first attempt at a TinyMCE plugin) and making ExtJs and TinyMCE integrate seamlessly.
 The first challenge was getting multiple buttons on the TinyMCE toolbar. It took me some time to figure out that you specify each button offered by a TinyMCE plugin independently in the theme_advanced_buttonsx configuration to the TinyMCE init method. This plugin adds 4 buttons (as you can see above in the screenshot), one for selecting images from the server to be inserted inline, second for selecting media files, third for uploading files and the last one is an info button for the plugin. Please note that the button for selecting Media files would be available only if the TinyMCE editor instance has the media plugin enabled for it, otherwise the button for selecting Media files would not show up on the toolbar. All the rest 3 buttons are always available irrespective of the plugins you have enabled for the TinyMCE editor instance.
I have used regular ExtJs window, TreePanel and GridPanel for the bulk of UI compromising the facilities for selecting files from the server and uploading them (as you can see in the screenshots below).


Having done this, the next important piece of the puzzle was how to get the user to enter the auxiliary information for the Images/Media files selected from the server (title, width, height etc). My initial instinct was to create custom UI for it in ExtJs. But then I thought there is no point re-inventing the wheel and it would be better to re-use the dialogs available from TinyMCE itself for the purpose.
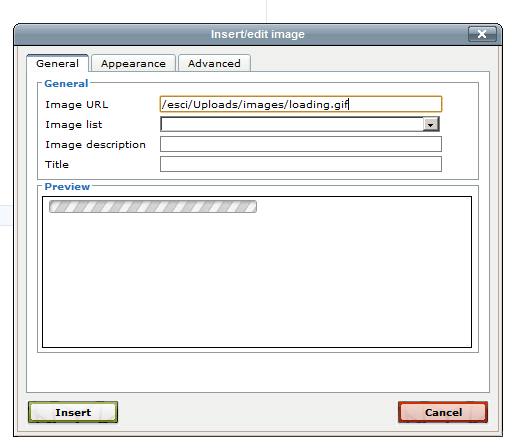
 So, after you select an Image file from the server, the ExtJs Browser plugin checks if the Advanced Image plugin is enabled for the editor instance. If its available, the Advanced Image popup is shown where the url to the image is already filled-in, you can see its Preview and add other information about the image. If Advanced Image plugin is not available, the basic Image pop-up is shown.
The ExtJsFileManager works with and without inline pop-ups for the TinyMCE Editor.
Similar thing happens for the Media selection button. You can browse and select the Media file from server and then the Media popup is shown to request further information about the selected Media file (this button as mentioned, is available only if Media plugin is enabled for the Tiny MCE editor instance).
So, that are some details on how this plugin for Tiny MCE works. Let’s now take a look at how to use this plugin. Following is a sample configuration to use this plugin:
{syntaxhighlighter brush: jscript;fontsize: 100; first-line: 1; }tinyMCE.init({
// General options
mode: “exact”,
elements: “txt1”,
theme: “advanced”,
skin: “o2k7”,
plugins: “autolink,lists,pagebreak,style,layer,table,save,advhr,advimage,advlink,emotions,iespell,inlinepopups,insertdatetime,preview,media,searchreplace,print,contextmenu,paste,directionality,fullscreen,noneditable,visualchars,nonbreaking,xhtmlxtras,template,wordcount,advlist,autosave,extjsfilemanager”,
// Theme options
theme_advanced_buttons1: “save,newdocument,|,bold,italic,underline,strikethrough,|,justifyleft,justifycenter,justifyright,justifyfull,styleselect,formatselect,fontselect,fontsizeselect”,
theme_advanced_buttons2: “cut,copy,paste,pastetext,pasteword,|,search,replace,|,bullist,numlist,|,outdent,indent,blockquote,|,undo,redo,|,link,unlink,anchor,image,cleanup,help,code,|,insertdate,inserttime,preview,|,forecolor,backcolor”,
theme_advanced_buttons3: “tablecontrols,|,hr,removeformat,visualaid,|,sub,sup,|,charmap,emotions,iespell,media,advhr,|,print,|,ltr,rtl,|,fullscreen”,
theme_advanced_buttons4: “insertlayer,moveforward,movebackward,absolute,|,styleprops,|,cite,abbr,acronym,del,ins,attribs,|,visualchars,nonbreaking,template,pagebreak,restoredraft,|,extjsfilemanagerselectimage,extjsfilemanagerselectmedia,extjsfilemanagerupload,extjsfilemanagerinfo”,
theme_advanced_toolbar_location: “top”,
theme_advanced_toolbar_align: “left”,
theme_advanced_statusbar_location: “bottom”,
theme_advanced_resizing: true,
//ExtJs FileManager options
//Required – Server url handling the requests
extjsfilemanager_handlerurl: ‘BrowserHandler.ashx’,
//Optional – Any extra parameters you want to have passed to your server-side handler on each request from the FileManager.
extjsfilemanager_extraparams: { param1: ‘value1’, param2: ‘value2’ }
});{/syntaxhighlighter}
There are 2 configuration options for this plugin:
- The handler url which would be responsible for handling all calls for fetching files, directories etc. for this plugin (samples for both ASP.NET and PHP are attached below). This is a required option.
- Any additional parameters you want to be sent to the server on each request by this plugin. This is an optional configuration for the plugin.
A good thing about this plugin is it does not assume anything on what’s happening on the server-side. So, if you want different files or directories to be shown depending upon the user or his/her roles, you do it completely server-side and send the accessible files/folders to the browser which this plugin then presents to the user to select from.
Further you can control which buttons are shown to the current user. e.g. if you want the current user to be only able to browse files from the server but not upload files, simply omit the Upload button from the configuration (whose key is extjsfilemanagerupload). Then you will need to take care on the server to reject the upload request if an unauthorized user tries to act smart and craft a manual upload request to the server.
But again, all this is handled server-side and you can use this plugin as a stand-alone interface on client-side to allow user to browse, select and/or upload images and media files from the server. And you can easily restrict in your server code which files and directories a user has access and can browse/upload to.
You will find 3 files attached below:
- extjsfilemanager.zip – This is the raw plugin code for TinyMCE that you drop to your TinyMCE’s plugins folder.
- The second is a complete sample application in .NET. You just download and extract it and run it over IIS, it comes bundled with ExtJs 4 and TineMCE 3, so no additional downloads would be required.
- The third is a complete sample application in PHP. Again, you just download and extract it and run it over Apche (or IIS), and it also comes bundled with ExtJs 4 and TineMCE 3.
If I get time, I would try to further enhance this plugin to a FileManager beast, something like my Take Control module for Drupal (but no promises, and it depends upon if I get time to work further on this plugin). In the meantime, the plugin in its present form should already satisfy many of the use-cases and should be a good alternative to the commercial counterparts from TinyMCE authors (no prizes for guessing, this plugin is totally free).
Hi, Nice job, thanks for your efforts, and the inspiration.
I found one thing: in fullscreen mode the Plugins Browser Window couldn’t be see, because of the z-index differences between the Ext.Window and the TinyMCE fullscreen editor.
My workaround is this little ExtJs trick to set the base z-index high enough:
Ext.WindowMgr.zseed = 300000; (at the end of your Test.js file)
Thanks again:
Balint
I would like to say thank you about your project. This very useful and readly had a nice screen.
Current using is dot net version, it’s okay.
jackie Tân.
Hi Rahul,
your file managing plugins are Ext4 based. Which plugin do you use for the TinyMCE? I am only aware of the Ext3 TinyMCE Plugin (link).
Björn
Hello, nice job..
I downloaded the asp.net project … What i want is to use the .net projec as an external application. So i include the js links in my project and i see the editor and i can upload files.
but … when i click the image button i’m getting an error
i notcied that i’m getting nulls for
Hello,
I am still having a few issues with the Extjs File Manager. The tinyMCE plug in is excellent, but I was wonderingw whether it would be possible to change the $base values in the BrowserHandler.php file.
I am wanting to be able to be able to provide a unique folder to a user so that other users would not be able to see their foldes on the hosting server.
I have tried changing the $base variable as in the example below and it produces the error below.
function validatePath ($path)
{
// The parent directory of this file is the application root for this test application.
$basePath =joinPaths(dirname(__FILE__), ‘Uploads/test’);
//$basePath =’Uploads’;
An uncaught error was raised: “You’re trying to decode and invalid JSON String: <br />
<b>Warning</b>: opendir(opt/lampp/htdocs/ejs/Uploads/test) [<a href=’function.opendir’>function.opendir</a>]: failed to open dir: No such file or directory in <b>/opt/lampp/htdocs/ejs/BrowserHandler.php</b> on line <b>63</b><br />
[]”. Use Firebug or Webkit console for additional details.
I am currently developing the web application on Ubuntu. I have checked the php settings and cannot find any reference to the Uploads folder. Obviously there is a path variable at the start of the BrowserHandler.php file, but this appears to have a Null value.
Hope you can help with this.
Regards
Steve
Hello Rahul,
All sorted now, many thanks for your help.
Steve
Hello Rahul, I have integrated this to my web system. It works normal on localhost. But don’t work on server.
I see this page so long time: Please wait… when click Upload files=>Upload directory
How to solve it?
Bayaraa
Problem solved. I think what there was 2 problems.
Thank you.
Hello Rahul,
ext-all.css conflicted with other my website css files.
I have searched so many and found this configuration
(Ext.scopeResetCSS=true;).Where use this configuration and how to solve my css conflict problem by another way?
it is good example thank you
Hi, Thanks for your lovely code.
Thank you very much !! , I have been searching for such a plugin a couple of hours, thanks a lot
thanks for your info!
Hello dear Rahul,
I want to use this plug in for my Java Spring project. I try to sent Json to list files and folders but it cant get understand my JSON. I think json structure have some problem: here is my handler java code
@RequestMapping(value = “/filehandler”, method = RequestMethod.POST)
public @ResponseBody byte[] filehandler(HttpServletRequest request, HttpServletResponse response) {
String op = request.getParameter(“op”);
String path = uploadDataFolder; // || request.getParameter(“path”);
String jsondata = “{ \”cls\”:\”folder\”,children:”;
String datastr = “”;
File folder = new File(path);
if (op.equals( “getFolders”)){
// FOLDERS
for (File fileEntry : folder.listFiles() ) {
//File fileEntry;
if (fileEntry.isDirectory()) {
datastr += “{\”text\”:\”” + fileEntry.getName() +
“\”,\”path\”:\”” + fileEntry.getPath() +
“\”,\”leaf\”:\”false\”” +
“,\”singleClickExpand\”:\”true\”}”;
}
}
}
else if (op == “getFiles”){
// FILES
for (File fileEntry : folder.listFiles()) {
//File fileEntry;
if (fileEntry.isFile()) {
datastr += “{\”text\”:\”” + fileEntry.getName() +
“\”,\”virtualPath\”:\”” + fileEntry.getPath() + “\””;
} else {
System.out.println(fileEntry.getName());
}
}
}
else if (op == “createFolder”){
// create folder function is not supported in our project
}
else if (op == “uploadFiles”){
// upload images
request.getAttribute(“Files”);
}
datastr = datastr.equals(“”) ? “null” : “[” + datastr + “]”;
jsondata += datastr + “}”;
return getBytes(jsondata);
}
Could you give me a perspective or structure to solve this problem?
Thank you…
Thanks a lot.. there was a minor issue with my configuration in the basepath and i have corrected it .. now i will have to integrate it with the database to see how it works there.. thanks anyways the image do get uploaded and displayed there in the editor.
Thanx alot, it’s amazing plugin 🙂
hello,
thanks a lot for this post, but i have a problem …
I used it in asp.net website … but the text area doesn’t maintain the state after postback …
if I entered text in the editor after postback the value of the text inside the editor is ” ” > (empty string) …..
please if you can .. tell me about thw solution, it’s necessary
thanks alot
Hi,
I came across your work on the file manager plugin for TinyMCE. It appears a very noce work. I decided to test it.
After uploading the package to my webserver I tried your example to see how it perfoms. Well, I am not sure why, I get the following error message – I know what it means but I am not sure why it would happen. Perhaps, you can fins a minute of time to
Warning: Cannot modify header information – headers already sent by (output started at /web-root/dev/4/vendors/ext4js/BrowserHandler.php:1) in/web-root/domani/dev/4/vendors/ext4js/BrowserHandler.php on line 5
Warning: opendir(/webroot/domain/dev/4/vendors/ext4js/Uploads) [function.opendir]: failed to open dir: No such file or directory in/webroot/domain/dev/4/vendors/ext4js/BrowserHandler.php on line 38
[]
Package I tried was fresh download from your webaite.
Thanks in advance,
Z. Hlousek
Hello Rahul,
I am working with Ext Js 4 and I need to use TinyMce editor in it.But I have one problem in TinyMce editor.
In my case two editor in tabpane which is in model window,first time when I open window height of first editor is more than i specifie in view but after switching tab it’s look fine. can you gusse what may be the problem.
Thanks,
Naresh
Hello,
Is it possible to have multiple folders in the Uploads folder?
If so is this a simple change to the browserhandler file?
Thanks
Steve
Hi,
I am looking for a sample java application code that uses extjsfilemanager plugin to upload files/images. Can you please provide the sample.
I would appreciate your quick response.
Thanks,
ARD.
Hello Rahul,
Thanks alot for ur amazing editor 🙂
but I have a problem, when I mark a text in this editor and try to apply style to it, it fails and doesn’t reflect on the text, it just add a class with the same name of the style only.
for Example:
if i write “Hello” .. then mark it and press on “Bold” Button, it doesn’t reflect !!, and in the debugging mode i notice that’s became “<span class=’bold’>Hello</span>” , and i haven’t class with that name so it didn’t reflect. !!!!
at other editors it became”<span style=’font-weight:bold’>Hello</span>” so it reflects.
what can I do for this problem ??!!
Hi Rahul,
I encounter a problem when I try to upload media file, the media file can’t be displayed or previewed, is it because I didn’t have any media player installed on my server? the upload image file works just fine anyway