Hello everyone, I am back 🙂 .
In my last blog post, I promised I would be sharing my thoughts here more often, but it still took me almost an entire year to come back and write again on my blog.
Anyways, I did something recently which was intriguing and exciting enough for me to leave other things aside and write about the same first. One of our Payment Gateway Providers for Mart raised some regulatory concerns for the way payments are handled in Mart requiring us to use a proxy domain for web-based Payment redirections to complete the payments with them. After discussions, it appeared a Proxy Payment Module developed with ItNet would have been the quickest and most effective solution to handle payments on the proxy domain.
Now Imbibe’s customers would know Mart is a PHP/Drupal based product while ItNet is a platform developed on Microsoft’s ASP.NET/MVC infrastructure. Essentially meaning we needed to exchange Payment data between Mart and ItNet. And whenever data exchange between 2 platforms is needed, encryption and hashing invariably pop-up. Asymmetric public private key cryptography is the de-facto norm today whether it involves encryption or hashing. And so, we developed an elaborate infrastructure to securely exchange both encrypted as well as hashed data between Mart (i.e. PHP) and ItNet (i.e. .NET/ASP.NET).
The exact mechanics of data exchange between the 2 systems cited above are not the subject of this blog post. But the underlying encryption/hashing techniques and how to use them to interoperably exchange data between PHP/.NET certainly are.
The work started on our end on .NET side first. With some of the prior work I had executed earlier for sending signed tokens from PHP to .NET and verifying them on .NET’s side, I knew PHP’s OpenSSL library supports PEM encoded keys only while’s .NET’s RSACryptoServiceProvider class has its own XML based representation for importing/exporting RSA keys. To achieve interoperability, the first step was being able to exchange public or private key of a key pair between PHP and .NET. And that’s where, the .NET port of the excellent BountyCastle library came to rescue. It provided methods to produce and/or consume PEM encoded keys/key pair and be able to convert them to .Net’s RSACryptoServiceProvider class.
In no time, was I able to muster up the following code to create PEM encoded public/private key in .NET using the BountyCastle library:
public static RsaKey generateKeyPair (
	string signatureAlgorithm = null,
	int rsaKeyLength = 2048
)
{
	if (string.IsNullOrEmpty(signatureAlgorithm))
	{
		signatureAlgorithm = PkcsObjectIdentifiers.Sha512WithRsaEncryption.Id;
	}

	var rsaKeyPairGenerator = new RsaKeyPairGenerator();
	rsaKeyPairGenerator.Init(new KeyGenerationParameters(new SecureRandom(new CryptoApiRandomGenerator()), rsaKeyLength));

	var pair = rsaKeyPairGenerator.GenerateKeyPair();
	var configuration = new RsaKey();

	var privateKeyStrBuilder = new StringBuilder();
	var privateKeyPemWriter = new PemWriter(new StringWriter(privateKeyStrBuilder));
	privateKeyPemWriter.WriteObject(pair.Private);
	privateKeyPemWriter.Writer.Flush();
	privateKeyPemWriter.Writer.Close();

	configuration.privateKey = privateKeyStrBuilder.ToString();


	var publicKeyStrBuilder = new StringBuilder();
	var publicKeyPemWriter = new PemWriter(new StringWriter(publicKeyStrBuilder));
	publicKeyPemWriter.WriteObject(pair.Public);
	publicKeyPemWriter.Writer.Flush();
	publicKeyPemWriter.Writer.Close();

	configuration.publicKey = publicKeyStrBuilder.ToString();

	return (configuration);
}
This post is going to get insanely long if I were to get into details of each line of how the above code generates the key pair. In a nut-shell, the function accepts the signature algorithm and key length, uses BountyCastle’s RsaKeyPairGenerator to generate the actual key pair and then uses BountyCastle’s PemWriter to actually get the PEM encoded public and private keys.
The next step was to get a RSACryptoServiceProvider instance for the generated public or private key. The following code does it:
public RSACryptoServiceProvider asRSACryptoServiceProvider (
	bool usePublicKey = false
)
{
	var keyStr = usePublicKey ? this.publicKey : this.privateKey;

	var pemReader = new PemReader(new StringReader(keyStr));

	if (usePublicKey)
	{
		var asymmetricKey = (AsymmetricKeyParameter) pemReader.ReadObject();
		pemReader.Reader.Close();

		var rsaKey = (Org.BouncyCastle.Crypto.Parameters.RsaKeyParameters) asymmetricKey;
		var rsaKeyInfo = Org.BouncyCastle.Security.DotNetUtilities.ToRSAParameters(rsaKey);

		var rsa = new RSACryptoServiceProvider();
		rsa.ImportParameters(rsaKeyInfo);

		return (rsa);
	}
	else
	{
		var pemObject = pemReader.ReadObject();
		Org.BouncyCastle.Crypto.Parameters.RsaPrivateCrtKeyParameters rsaKey;
		if (pemObject is Org.BouncyCastle.Crypto.Parameters.RsaPrivateCrtKeyParameters)
		{
			rsaKey = (Org.BouncyCastle.Crypto.Parameters.RsaPrivateCrtKeyParameters) pemObject;
		}
		else
		{
			var asymmetricKey = (AsymmetricCipherKeyPair) pemObject;
			rsaKey = (Org.BouncyCastle.Crypto.Parameters.RsaPrivateCrtKeyParameters) asymmetricKey.Private;
		}
		pemReader.Reader.Close();

		var rsaKeyInfo = Org.BouncyCastle.Security.DotNetUtilities.ToRSAParameters(rsaKey);

		var rsa = new RSACryptoServiceProvider();
		rsa.ImportParameters(rsaKeyInfo);

		return (rsa);

	}
}
Again skipping the nitty-gritty explanation of the above code for the sake of brevity, will try to write the same in a separate blog post.
Once you get your hands on a RSACryptoServiceProvider instance, writing the encrypt / decrypt / sign / verify logic for the same is pretty straight-forward as outlined below.
public string encrypt (
	string data,
	bool usePublicKey = false
)
{
	var rsa = this.asRSACryptoServiceProvider(usePublicKey: usePublicKey);

	byte[] encryptedData = rsa.Encrypt(System.Text.Encoding.UTF8.GetBytes(data), true);
	var str = Convert.ToBase64String(encryptedData);

	return (str);
}

public string decrypt (
	string data,
	bool usePublicKey = false
)
{
	var rsa = this.asRSACryptoServiceProvider(usePublicKey: usePublicKey);

	byte[] decryptedData = rsa.Decrypt(Convert.FromBase64String(data), true);
	var str = System.Text.Encoding.UTF8.GetString(decryptedData);

	return (str);
}

public string hash (
	string data,
	bool usePublicKey = false
)
{
	var rsa = this.asRSACryptoServiceProvider(usePublicKey: usePublicKey);

	byte[] encryptedData = rsa.SignData(System.Text.Encoding.UTF8.GetBytes(data), new SHA512CryptoServiceProvider());
	var str = Convert.ToBase64String(encryptedData);

	return (str);
}

public void verifyHash (
	string data,
	string hash,
	bool usePublicKey = false
)
{
	var rsa = this.asRSACryptoServiceProvider(usePublicKey: usePublicKey);

	var isValid = rsa.VerifyData(System.Text.Encoding.UTF8.GetBytes(data), new SHA512CryptoServiceProvider(), Convert.FromBase64String(hash));
	if (!isValid)
	{
		throw new CryptographicException("Invalid hash.");
	}
}
The only thing you need to take particular care of is to ensure the order of encoding/decoding data (from string to binary and vice versa) is exactly reverse between encrypt/decrypt and hash/verifyHash methods respectively. Your entire logic is going to fall apart if you miss proper encoding/decoding procedures while transmitting data between systems. Base64 is the safest format for interoperable data exchange, so the method above encodes any output it returns to Base64 while assuming the input would be Base64 encoded too.
Next we come on to PHP’s side. The excellent OpenSSL library for PHP provides straight forward methods for RSA encryption / decryption / signing / verification. Again you have to ensure your encoding / decoding procedures are exactly same and compatible to what you did on .NET’s side.
Here’s the encryption logic in PHP:
$publicKeyRes = openssl_pkey_get_public($publicKey);
$result = openssl_public_encrypt($text, $encrypted, $publicKeyRes, OPENSSL_PKCS1_OAEP_PADDING);
if(!$result) {
	throw new \Exception('Could not encrypt text.');
}

$encrypted = base64_encode($encrypted);
This is the decryption logic (again PHP):
$encrypted = base64_decode($encrypted);

$privateKeyRes = openssl_pkey_get_private($privateKey);
$result = openssl_private_decrypt($encrypted, $text, $privateKeyRes, OPENSSL_PKCS1_OAEP_PADDING);
if(!$result) {
	throw new \Exception('Could not decrypt text.');
}
The signing logic:
$privateKeyRes = openssl_pkey_get_private($privateKey);
$result = openssl_sign($text, $signature, $privateKeyRes, OPENSSL_ALGO_SHA512);
if(!$result) {
	throw new \Exception('Could not hash text.');
}

$signature = base64_encode($signature);
And finally the logic for signature verification:
$signature = base64_decode($signature);

$publicKeyRes = openssl_pkey_get_public($publicKey);
$result = openssl_verify($text, $signature, $publicKeyRes, OPENSSL_ALGO_SHA512);
if($result != 1) {
	throw new \Exception('Could not verify signature.');
}
I have produced 2 simple PHP and ASP.NET projects to demonstrate the entire workflow.
The PHP project can be downloaded from here.
While the .NET project can be downloaded from here.
I deliberately tried to keep both the projects as simple as possible and reduce the use of external libraries to a bare minimum. The PHP project uses no external library (client or server-side). While the .NET project uses BountyCastle for handling PEM encoded keys and Newtonsoft.Json for handling Json serialization. It again does not use any client-side library. The entire html is hand-written and very bare to be able to concentrate on the actual encryption/hashing logic.
To setup the PHP project:
- Download the project zip from here:
http://download.imbibetech.com/blog/post/2020/03/php-dotnet-cryptography/cryptography-php.zip - Extract inside a folder under your Apache web directory.
- Note the url of the root of the project in Apache. On my machine, the same was: http://localhost:8080/cryp/.
You will need to update this url in the .NET project.
To setup the .NET project:
- Download the project zip from here:
http://download.imbibetech.com/blog/post/2020/03/php-dotnet-cryptography/cryptography-net.zip - Extract inside a folder on your file-system.
- Open
Cryptography.slnsolution in Visual Studio. - Open
Classes\Common.csfile and update the PHP project’s Apache url here (from step 3 in PHP installation instructions). Make sure the url ends with forward-slash (/). - Build the solution.
- Open IIS and point an application to the folder containing
Web.configfile. - Note the url of this application in IIS. On my machine, the same was: http://localhost/cryp/.
(Basically Apache was running on 8080 port while IIS on the default 80 HTTP port). - Update this IIS application url in
Common.phpfile inside the PHP project. Again ensure the url ends with forward-slash (/).
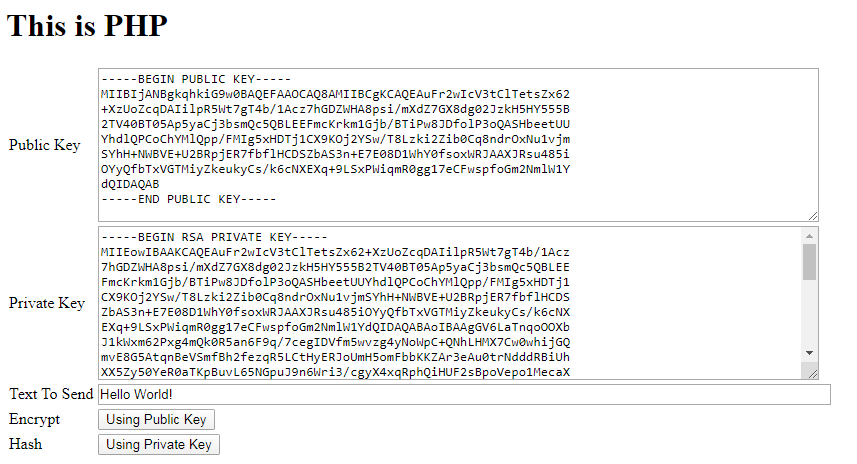
That’s it. You are all setup. Go ahead and point your browser to the PHP application url (http://localhost:8080/cryp/ in my example). You would see a screen similar to the following:

Clicking the first option would cause PHP application to contact the ASP.NET application to generate a public/private key pair and download it. Clicking the second would cause PHP itself to generate the said key pair using OpenSSL library. Before generating the key pair using PHP, ensure to open the Util/KeyGenerator.php file and point config option on line 15 to appropriate openssl.cnf file location on your machine. Check this link for details on the same.
In any case, clicking any of the 2 links is going to bring you to the following page:
Public/Private key has been generated and populated using either .NET or PHP. The sample text to encrypt or sign is pre-populated too. When you choose to Encrypt using the Public key, the code would encrypt the string and send to the ASP.NET application. On .NET’s side, the same is decrypted using the private key and shown back to you as in the following screenshot:
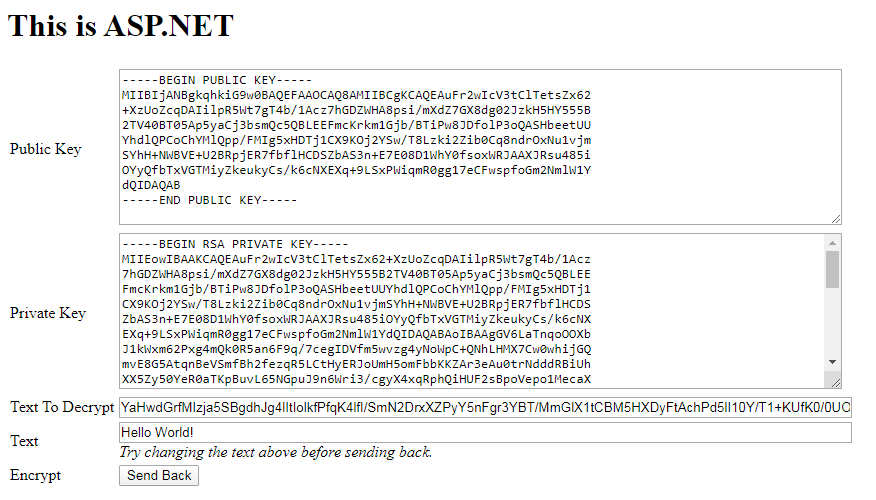
If you see this screen, it would mean the PHP encrypted text was successfully decrypted and populated on screen on .NET’s side. Now let’s encrypt on .NET’s side and send back to PHP’s side. Change the text if you would like to and click “Send Back“. .NET would encrypt the string using public key and send to PHP which would decrypt and show the following screen:
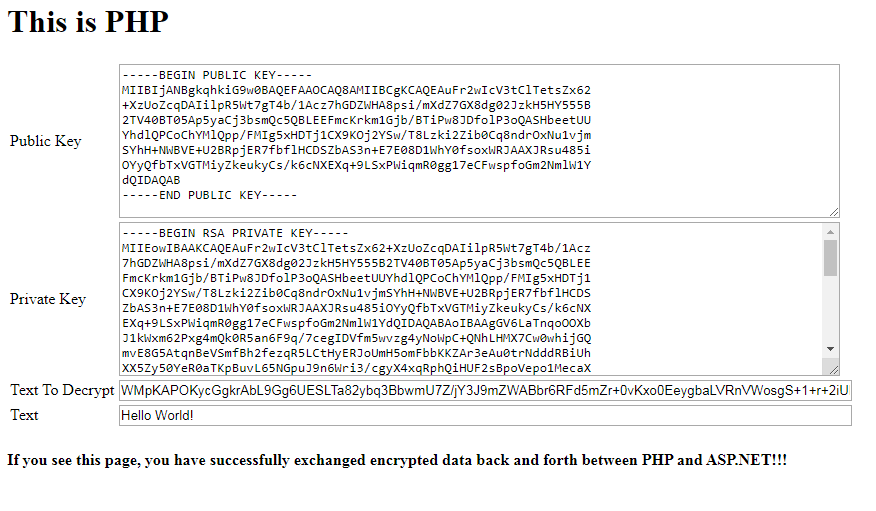
This completes the encryption/decryption workflow between PHP and .NET. The signing/verification process works quite similarly. Instead of encrypt, try clicking the Hash “Using Private Key” in this step.
I would like to highlight some points as regards the blog post itself and the sample projects:
- The code is strictly for demonstration purposes only. Public/private keys are being posted between PHP and .NET which kind of defeats the whole purpose. The idea is to demonstrate the process of encryption/signing, not how to safely store the keys themselves. It would be prudent to safely store the keys in your systems.
- Theoretically data encrypted with private key can be decrypted with public keys. Practically neither .NET nor PHP supports it. You can only encrypt with public key and decrypt with private key.
- PHP has limits on the length of data it can encrypt/decrypt (check this comment). If you try to encrypt larger length data, you would simply get an error and you won’t know what went wrong. Ensure you limit the length of string you are trying to encrypt/decrypt. For our implementation in Mart/ItNet, we split larger length strings into smaller ones, encrypting them in parts and transmitting the parts. On the receiving end, we would decrypt the parts and then combine them to get the original string back.
- Pay attention to the way data is being encoded/decoded on both sides and also for transmission. You miss or jumble the encode/decode steps, and you will again get errors.
Would love to hear your feedback, use the Comments section below for the same.
Thank you very much.
Your article has helped me a lot.
I would only change the default values for bool usePublicKey in the methods encrypt and verifyHash to “true” in the .NET part. Or remove this parameter because encrypt and verifyHash are always used with the public key, and decrypt and hash are always used with private key.
Regards
Michael
Well, glad it helped Michael. And thanks for your feedback too.